Fast Charles Proxy Configuration for your Android App
Oct 29, 2017 21:57 · 474 words · 3 minutes read
I’ve been using Charles for few years, and when my emulators start to fuck up after an update, I end up reconfiguring new ones. It’s always a pain to remember how after a year. So let’s write them up once for all.
Of course, you will need to launch Charles Proxy and get your computer IP. I’ve set-up those alias in my .bash_profile to get it via my terminal.
alias ipcable='ipconfig getifaddr en1'
alias ipwifi='ipconfig getifaddr en0'
Setting up the Emulator
Then we need to configure our emulators to thrust this proxy to not you will get a rejected API call.
Create the emulator you want to use in Android Studio and name it without spaces. It’s easier to write in a terminal. Let’s call it: N5-7.1.1-API25
Let’s open a terminal now and navigate to the Android Tools directory:
cd ~/Library/Android/sdk/tools/
Then list all the emulators you have:
./bin/avdmanager list avd
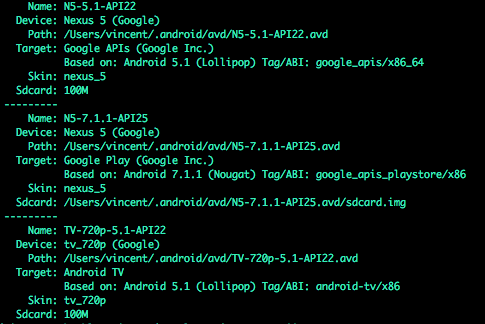
Awesome our N5-7.1.1-API25 is there. Let’s launch it with the proxy and replace <my-ip> by your current IP.
emulator @N5-7.1.1-API25 -http-proxy <my-ip>:8888
- When your emulator is ready, launch Chrome and navigate to http://chls.pro/ssl (Don’t use Firefox, it tried to install the certificate directly as a firefox certificate. It will not work, you want a system-wide certificate)
- Once downloaded go to the Emulator Settings -> Security -> Credential Storage -> Install From SD card
- Select your Charles Certificate and install it.
- Android will prompt you to add a Pin Lock Screen (1111 will do the trick).
- You can now shutdown your emulator and start it back without the proxy settings.
Using a Proxy in your code
I don’t want to use Charles all the time, so I will create a Proxy Flavor to use it.
// app.build, Gradle 3.0
Android {
  flavorDimensions "tier" // you don't need this line if under gradle 3.0
  productFlavors {
   dev { }
   proxy { }
   prod { }
  }
}
If you are using Retrofit with OkHttp like me, you will have to configure a Proxy and set it up in your RetrofitBuilder.
fun getOkHttpClient(): OkHttpClient {
  if (BuildConfig.FLAVOR == "proxy") {
     return OkHttpClient.Builder()
       .proxy(Proxy(Proxy.Type.HTTP, InetSocketAddress(Const.MY_IP, 8888)))
       .build()
  } else {
     return OkHttpClient.Builder().build()
  }
}
val retrofitInstance = Retrofit.Builder()
   .addCallAdapterFactory(RxJava2CallAdapterFactory.create())
   .baseUrl(endpoint.url)
   .client(getOkHttpClient())
   .build()
Now, when you use your proxy build flavor, you should see your calls in Charles… Or not…
Extra step for Android Nougat (7.0-Api24)
As of Android N, your app will not trust proxies that easily . You will need to add this file: res/xml/network_security_config.xml
<network-security-config>
   <debug-overrides>
     <trust-anchors>
       <!-- Trust user added CAs while debuggable only -->
       <certificates src="user" />
     </trust-anchors>
   </debug-overrides>
</network-security-config>
And add a reference into your AndroidManifest.xml. It can be in your Debug or Main repository, it’s only used in debug anyway.
<application
    // [...]
    android:networkSecurityConfig="@xml/network_security_config"
    >
</application>
Here we go, you should be able to check the network calls of your app.